Difference between revisions of "Camera Calibration Targets"
m |
m |
||
| (3 intermediate revisions by the same user not shown) | |||
| Line 1: | Line 1: | ||
== | == Online Editor == | ||
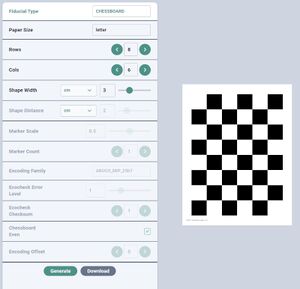
BoofCV provides an application for generating your own custom calibration target. | A web version ([https://www.ninox360.com/calibration-targets link]) of the desktop has been created and hosted by [https://www.ninox360.com Ninox 360]. It has almost all the features of the desktop application but runs in your browser. | ||
[[File:Online_calibration_target_generator.jpg|300px|link=https://www.ninox360.com/calibration-targets]] | |||
== Desktop Editor == | |||
BoofCV provides an application for generating your own custom calibration target. It allows you to specify which pattern you wish to use, the paper, and other specifications. A command line interface as well as a graphics interface are provided. The graphical interface gives you live preview as you adjust settings. | |||
* [https://youtu.be/qMTtdiujAtQ?t=559 Video demonstration of command-line] | |||
* [https://youtu.be/TGg-xgTyaU8?t=604 Video demonstration of GUI Application] | |||
* [[Applications#Create_Calibration_Fiducials|Instructions for installing pre-built application]] | |||
* Below are instructions for building it yourself from BoofCV's source code | |||
<syntaxhighlight lang="bash"> | <syntaxhighlight lang="bash"> | ||
cd boofcv | cd boofcv | ||
| Line 8: | Line 19: | ||
</syntaxhighlight> | </syntaxhighlight> | ||
The last line above will run the application with no arguments. This will print out up to date instructions. At the end of the instructions are examples for each target type on letter sized paper. If you wish to have a GUI when creating your calibration target add the --GUI flag. The GUI doesn't have all the options which the | The last line above will run the application with no arguments. This will print out up to date instructions. At the end of the instructions are examples for each target type on letter sized paper. If you wish to have a GUI when creating your calibration target add the --GUI flag. The GUI doesn't have all the options which the command line has. | ||
<syntaxhighlight lang="bash"> | <syntaxhighlight lang="bash"> | ||
| Line 14: | Line 25: | ||
</syntaxhighlight> | </syntaxhighlight> | ||
== Downloadable Targets == | |||
Instead of creating a custom target you can use one of the pregenerated targets for standard document sizes. | |||
{| class="wikitable" | {| class="wikitable" | ||
| Line 26: | Line 36: | ||
!Shape | !Shape | ||
!Square/Circle Size | !Square/Circle Size | ||
|- | |||
|[[File:Ecocheck_9x7n1.png|60px|link=http://boofcv.org/notwiki/calibration/letter_ecocheck_9x7n1.pdf]] | |||
| ECoCheck 9x7n1 | |||
| Letter | |||
| 9 by 7 | |||
| 3cm | |||
|- | |- | ||
|[[File:Calibration_letter_chessboard_7x5.png|60px|link=http://boofcv.org/notwiki/calibration/letter_chessboard.pdf]] | |[[File:Calibration_letter_chessboard_7x5.png|60px|link=http://boofcv.org/notwiki/calibration/letter_chessboard.pdf]] | ||
| Line 59: | Line 75: | ||
!Shape | !Shape | ||
!Square/Circle Size | !Square/Circle Size | ||
|- | |||
|[[File:Ecocheck_9x7n1.png|60px|link=http://boofcv.org/notwiki/calibration/A4_ecocheck_10x7n1.pdf]] | |||
| ECoCheck 10x7n1 | |||
| A4 | |||
| 10 by 7 | |||
| 3cm | |||
|- | |- | ||
|[[File:Calibration_A4_chessboard_9x6.png|60px|link=http://boofcv.org/notwiki/calibration/A4_chessboard.pdf]] | |[[File:Calibration_A4_chessboard_9x6.png|60px|link=http://boofcv.org/notwiki/calibration/A4_chessboard.pdf]] | ||
Latest revision as of 08:11, 10 November 2022
Online Editor
A web version (link) of the desktop has been created and hosted by Ninox 360. It has almost all the features of the desktop application but runs in your browser.
Desktop Editor
BoofCV provides an application for generating your own custom calibration target. It allows you to specify which pattern you wish to use, the paper, and other specifications. A command line interface as well as a graphics interface are provided. The graphical interface gives you live preview as you adjust settings.
- Video demonstration of command-line
- Video demonstration of GUI Application
- Instructions for installing pre-built application
- Below are instructions for building it yourself from BoofCV's source code
cd boofcv
./gradlew applicationsJar
java -jar applications/applications.jar CreateCalibrationTarget
The last line above will run the application with no arguments. This will print out up to date instructions. At the end of the instructions are examples for each target type on letter sized paper. If you wish to have a GUI when creating your calibration target add the --GUI flag. The GUI doesn't have all the options which the command line has.
java -jar applications/applications.jar CreateCalibrationTarget --GUI
Downloadable Targets
Instead of creating a custom target you can use one of the pregenerated targets for standard document sizes.
- Shape for chessboard includes black and white squares
- Shape for square grid is only the black squares
WHEN PRINTING CALIBRATION TARGETS MAKE SURE YOUR PRINTER DOES NOT RESCALE THE DOCUMENTS!
After printing use a ruler to make sure it's the correct size


