Difference between revisions of "Applications"
m |
m (→Java) |
||
| (11 intermediate revisions by the same user not shown) | |||
| Line 1: | Line 1: | ||
= Installing = | |||
All the desktop applications below are Java applications. Once you have Java installed its easy launch them from the command line. Launching them like a regular desktop application will come in a future and requires wrapping the Java application. Let us know if you want to help with that! | |||
The easiest way to get the applications is to download them, but you can also build them from source code. | |||
Downloading Jars (Easiest Way): | |||
* [https://sourceforge.net/projects/boofcv/files/apps/BoofDemonstrations.zip/download Examples and Demonstrations] | |||
* [https://sourceforge.net/projects/boofcv/files/apps/BoofApplications.zip/download Applications] | |||
Building from BoofCV's Source Code: | |||
<pre> | |||
cd boofcv | |||
./gradlew examples | |||
java -jar examples/examples.jar | |||
./gradlew demonstrations | |||
java -jar demonstrations/demonstrations.jar | |||
</pre> | |||
== Java == | |||
If you don't have Java installed on your system you will need to do that. The code has been built so that it will run on Java 11 or newer. | |||
* [https://www.azul.com/downloads/zulu/ Download JRE 11 from Azul] | |||
== Windows == | == Windows == | ||
| Line 29: | Line 37: | ||
== Mac OS X == | == Mac OS X == | ||
There's currently no easy way to launch a jar in Mac OS X any more that I'm away of so you will need to use the command line to launch it. In older versions of OS X you could just double click the jar. | |||
# Double click BoofDemonstrations.zip and it should automatically decompress | |||
# Open Terminal.app | |||
<pre> | |||
cd Downloads/BoofDemonstrations | |||
java -jar demonstrations.jar | |||
</pre> | |||
== Linux == | == Linux == | ||
| Line 39: | Line 57: | ||
java -jar demonstrations.jar | java -jar demonstrations.jar | ||
</pre> | </pre> | ||
= Utilities and Applications = | |||
<center>[[File:boofcv_applications.png|500px|frameless|border|Application Launcher]]</center> | |||
<center><span style="font-size:150%;font-weight: bold;">[https://sourceforge.net/projects/boofcv/files/apps/BoofApplications.zip/download Download Applications]</span></center> | |||
BoofCV comes with several utilities and general applications for assisting with computer vision. For example, you can print a calibration target, create a custom AR marker, undistort a large number of images, create QR Codes, and calibrate your camera. | |||
Everyone one of these application can be run from the command line. They were originally command line applications and the command line interface has a few features which haven't been integrated into the GUI yet. | |||
== Create QR Code == | |||
Let's you create a QR code and control every setting. These QR Codes are also fully standards compliant. A surprising number of QR Code generates found online generate invalid QR Codes that can't be read by every scanner. | |||
== Create Calibration Fiducials == | |||
Used to create many different types of calibration patterns. See [[Tutorial_Camera_Calibration|calibration]] tutorial for more details. | |||
== Create Square Binary == | |||
Print out one or more square binary fiducials on a page. | |||
== Create Square Image == | |||
Print out one or more square image fiducials on a page. | |||
== Camera Calibration == | |||
Calibrate live from a webcam or already collected images. Provides several useful tools to inspects the results. | |||
== Batch Downsize == | |||
Down samples images in batch mode. The down sampling technique used here is better than most other applications which use bilinear interpolation. This application averages the entire local region, resulting in less aliasing and other artifacts. | |||
== Batch Undistort == | |||
Remove lens distortion from a calibrated camera in match mode. | |||
= Examples and Demonstrations = | |||
<center><span style="font-size:150%;font-weight: bold;">[https://sourceforge.net/projects/boofcv/files/apps/BoofDemonstrations.zip/download Download Examples and Demonstrations]</span></center> | |||
This application allows you to run every example and demonstration, view its source code in the application, or open it up on Github. A jar is provided which will launch a GUI. You can select examples or demonstrations. Examples is easy to understand code while Demonstrations focuses more on visualization. [https://youtu.be/qMTtdiujAtQ?t=107 YouTube Video of an earlier version] | |||
After that selection has been made another window opens. You can select the specific example you wish to run on the left by expanding the category and double clicking on the example's name. If you right click on a name a sub-menu appears which lets you copy the example's name, path, or open it up on Github. After launching an example a tab will open on the right. A menu is shown which lets you view the standard output from the application or view its source code. | |||
<center>[[File:Demonstration_launcher.png|500px|frameless|border|Demonstration Launcher]]</center> | |||
Latest revision as of 15:53, 20 October 2021
Installing
All the desktop applications below are Java applications. Once you have Java installed its easy launch them from the command line. Launching them like a regular desktop application will come in a future and requires wrapping the Java application. Let us know if you want to help with that!
The easiest way to get the applications is to download them, but you can also build them from source code.
Downloading Jars (Easiest Way):
Building from BoofCV's Source Code:
cd boofcv
./gradlew examples
java -jar examples/examples.jar
./gradlew demonstrations
java -jar demonstrations/demonstrations.jar
Java
If you don't have Java installed on your system you will need to do that. The code has been built so that it will run on Java 11 or newer.
Windows
Because the application hasn't been blessed by Microsoft you will need to go through additional steps
- Double click on the BoofDemonstrations.zip you just downloaded
- Drag the BoofDemonstrations folder to your Desktop
- Open BoofDemonstrations
- Double click on BoofDemonstrations/demonstrations.bat
- If a dialog open complaining about the the application being untrusted
- Click "More Info"
- Tell it to run
Mac OS X
There's currently no easy way to launch a jar in Mac OS X any more that I'm away of so you will need to use the command line to launch it. In older versions of OS X you could just double click the jar.
- Double click BoofDemonstrations.zip and it should automatically decompress
- Open Terminal.app
cd Downloads/BoofDemonstrations
java -jar demonstrations.jar
Linux
- Unzip the BoofDemonstrations.zip
- Open a terminal
- Launch the Jar
cd BoofDemonstrations
java -jar demonstrations.jar
Utilities and Applications

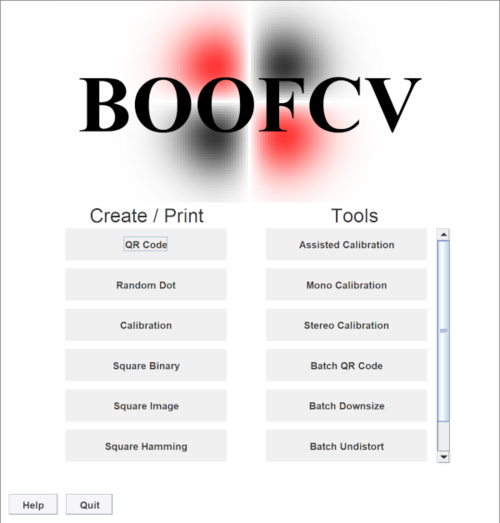
BoofCV comes with several utilities and general applications for assisting with computer vision. For example, you can print a calibration target, create a custom AR marker, undistort a large number of images, create QR Codes, and calibrate your camera.
Everyone one of these application can be run from the command line. They were originally command line applications and the command line interface has a few features which haven't been integrated into the GUI yet.
Create QR Code
Let's you create a QR code and control every setting. These QR Codes are also fully standards compliant. A surprising number of QR Code generates found online generate invalid QR Codes that can't be read by every scanner.
Create Calibration Fiducials
Used to create many different types of calibration patterns. See calibration tutorial for more details.
Create Square Binary
Print out one or more square binary fiducials on a page.
Create Square Image
Print out one or more square image fiducials on a page.
Camera Calibration
Calibrate live from a webcam or already collected images. Provides several useful tools to inspects the results.
Batch Downsize
Down samples images in batch mode. The down sampling technique used here is better than most other applications which use bilinear interpolation. This application averages the entire local region, resulting in less aliasing and other artifacts.
Batch Undistort
Remove lens distortion from a calibrated camera in match mode.
Examples and Demonstrations
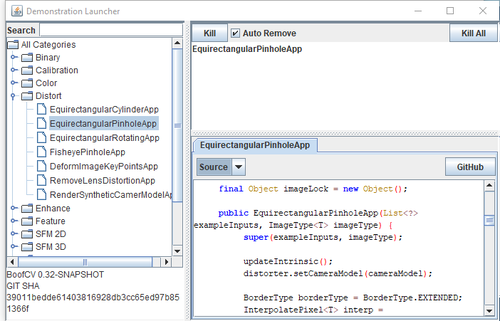
This application allows you to run every example and demonstration, view its source code in the application, or open it up on Github. A jar is provided which will launch a GUI. You can select examples or demonstrations. Examples is easy to understand code while Demonstrations focuses more on visualization. YouTube Video of an earlier version
After that selection has been made another window opens. You can select the specific example you wish to run on the left by expanding the category and double clicking on the example's name. If you right click on a name a sub-menu appears which lets you copy the example's name, path, or open it up on Github. After launching an example a tab will open on the right. A menu is shown which lets you view the standard output from the application or view its source code.
