Difference between revisions of "Example Wavelet Noise Removal"
m |
m |
||
| (11 intermediate revisions by the same user not shown) | |||
| Line 1: | Line 1: | ||
<center> | <center> | ||
<gallery widths=300px heights=300px> | <gallery widths=300px heights=300px> | ||
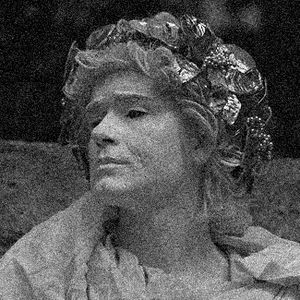
File:Kodim17_noisy.jpg | Image with Gaussian noise added to it. | |||
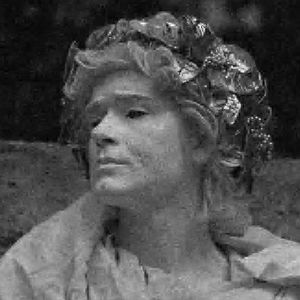
File:Kodim17_denoised.jpg | After a Bayes Shrink. | |||
</gallery> | </gallery> | ||
</center> | </center> | ||
| Line 10: | Line 8: | ||
Image noise removal is the process of attempting to under the corruption caused by noise. Often this noise is modeled as Gaussian noise being added to each pixel independently. Several different wavelet algorithms have been proposed for removing noise from image. These work by determining the statistical properties of the wavelet coefficients and removing the outliers. | Image noise removal is the process of attempting to under the corruption caused by noise. Often this noise is modeled as Gaussian noise being added to each pixel independently. Several different wavelet algorithms have been proposed for removing noise from image. These work by determining the statistical properties of the wavelet coefficients and removing the outliers. | ||
Except in highly constrained situations when strong assumptions can be made, it is never possible to recover the original image perfectly. Wavelet based methods do have some advantages over other commonly used techniques. For example, they tend to preserve edge features better than applying Gaussian blur. To see a comparison between some of these techniques, | Except in highly constrained situations when strong assumptions can be made, it is never possible to recover the original image perfectly. Wavelet based methods do have some advantages over other commonly used techniques. For example, they tend to preserve edge features better than applying Gaussian blur. To see a comparison between some of these techniques, open the demonstration included with the project source code. | ||
In the example below a simply interface is used to instantiate a wavelet based image denoiser. This filter is then used to remove the noise and create a smoother image that appears less noisy. | In the example below a simply interface is used to instantiate a wavelet based image denoiser. This filter is then used to remove the noise and create a smoother image that appears less noisy. | ||
Example Code: | Example Code: | ||
* [https://github.com/lessthanoptimal/BoofCV/blob/v0. | * [https://github.com/lessthanoptimal/BoofCV/blob/v0.38/examples/src/main/java/boofcv/examples/enhance/ExampleWaveletDenoise.java ExampleWaveletDenoise.java] | ||
Concepts: | Concepts: | ||
* Noise Removal | * Noise Removal | ||
* Wavelets | * Wavelets | ||
= Example Code = | = Example Code = | ||
| Line 28: | Line 23: | ||
<syntaxhighlight lang="java"> | <syntaxhighlight lang="java"> | ||
/** | /** | ||
* Example of how to "remove" noise from images using wavelet based algorithms. | * Example of how to "remove" noise from images using wavelet based algorithms. A simplified interface is used | ||
* which hides most of the complexity. | * which hides most of the complexity. Wavelet image processing is still under development and only floating point | ||
* images are currently supported. | * images are currently supported. Which is why the image type is hard coded. | ||
*/ | */ | ||
public class ExampleWaveletDenoise { | public class ExampleWaveletDenoise { | ||
public static void main( String | public static void main( String[] args ) { | ||
// load the input image, declare data structures, create a noisy image | // load the input image, declare data structures, create a noisy image | ||
Random rand = new Random(234); | Random rand = new Random(234); | ||
GrayF32 input = UtilImageIO.loadImage(UtilIO.pathExample("standard/kodim17.jpg"),GrayF32.class); | |||
GrayF32 noisy = input.clone(); | |||
GImageMiscOps.addGaussian(noisy, rand, 20, 0, 255); | |||
GrayF32 denoised = noisy.createSameShape(); | |||
// How many levels in wavelet transform | // How many levels in wavelet transform | ||
int numLevels = 4; | int numLevels = 4; | ||
// Create the noise removal algorithm | // Create the noise removal algorithm | ||
WaveletDenoiseFilter< | WaveletDenoiseFilter<GrayF32> denoiser = | ||
FactoryImageDenoise.waveletBayes(GrayF32.class,numLevels,0,255); | |||
// remove noise from the image | // remove noise from the image | ||
| Line 58: | Line 54: | ||
gui.addImage(ConvertBufferedImage.convertTo(denoised,null),"Denoised"); | gui.addImage(ConvertBufferedImage.convertTo(denoised,null),"Denoised"); | ||
ShowImages.showWindow(gui,"Wavelet Noise Removal Example"); | ShowImages.showWindow(gui,"Wavelet Noise Removal Example",true); | ||
} | } | ||
} | } | ||
</syntaxhighlight> | </syntaxhighlight> | ||
Latest revision as of 09:17, 12 July 2021
Image noise removal is the process of attempting to under the corruption caused by noise. Often this noise is modeled as Gaussian noise being added to each pixel independently. Several different wavelet algorithms have been proposed for removing noise from image. These work by determining the statistical properties of the wavelet coefficients and removing the outliers.
Except in highly constrained situations when strong assumptions can be made, it is never possible to recover the original image perfectly. Wavelet based methods do have some advantages over other commonly used techniques. For example, they tend to preserve edge features better than applying Gaussian blur. To see a comparison between some of these techniques, open the demonstration included with the project source code.
In the example below a simply interface is used to instantiate a wavelet based image denoiser. This filter is then used to remove the noise and create a smoother image that appears less noisy.
Example Code:
Concepts:
- Noise Removal
- Wavelets
Example Code
/**
 * Example of how to "remove" noise from images using wavelet based algorithms. A simplified interface is used
 * which hides most of the complexity. Wavelet image processing is still under development and only floating point
 * images are currently supported. Which is why the image  type is hard coded.
 */
public class ExampleWaveletDenoise {

	public static void main( String[] args ) {

		// load the input image, declare data structures, create a noisy image
		Random rand = new Random(234);
		GrayF32 input = UtilImageIO.loadImage(UtilIO.pathExample("standard/kodim17.jpg"),GrayF32.class);

		GrayF32 noisy = input.clone();
		GImageMiscOps.addGaussian(noisy, rand, 20, 0, 255);
		GrayF32 denoised = noisy.createSameShape();

		// How many levels in wavelet transform
		int numLevels = 4;
		// Create the noise removal algorithm
		WaveletDenoiseFilter<GrayF32> denoiser =
				FactoryImageDenoise.waveletBayes(GrayF32.class,numLevels,0,255);

		// remove noise from the image
		denoiser.process(noisy,denoised);

		// display the results
		ListDisplayPanel gui = new ListDisplayPanel();
		gui.addImage(ConvertBufferedImage.convertTo(input,null),"Input");
		gui.addImage(ConvertBufferedImage.convertTo(noisy,null),"Noisy");
		gui.addImage(ConvertBufferedImage.convertTo(denoised,null),"Denoised");

		ShowImages.showWindow(gui,"Wavelet Noise Removal Example",true);
	}
}

