Difference between revisions of "Example Video Mosaic"
From BoofCV
Jump to navigationJump to searchm |
m |
||
| Line 8: | Line 8: | ||
of the complexity. The mosaic is created by tracking image features and fitting a motion model (affine or homography) to the feature's location in each frame. | of the complexity. The mosaic is created by tracking image features and fitting a motion model (affine or homography) to the feature's location in each frame. | ||
Example File: [https://github.com/lessthanoptimal/BoofCV/blob/v0. | Example File: [https://github.com/lessthanoptimal/BoofCV/blob/v0.36/examples/src/main/java/boofcv/examples/geometry/ExampleVideoMosaic.java ExampleVideoMosaic.java] | ||
Concepts: | Concepts: | ||
| Line 37: | Line 37: | ||
// Configure the feature detector | // Configure the feature detector | ||
ConfigPointDetector configDetector = new ConfigPointDetector(); | |||
configDetector.type = PointDetectorTypes.SHI_TOMASI; | |||
configDetector.general.maxFeatures = 300; | |||
configDetector.general.radius = 3; | |||
configDetector.general.threshold = 1; | |||
// Use a KLT tracker | // Use a KLT tracker | ||
PointTracker<GrayF32> tracker = FactoryPointTracker.klt( | PointTracker<GrayF32> tracker = FactoryPointTracker.klt(4,configDetector,3,GrayF32.class,GrayF32.class); | ||
// This estimates the 2D image motion | // This estimates the 2D image motion | ||
Revision as of 21:11, 17 May 2020
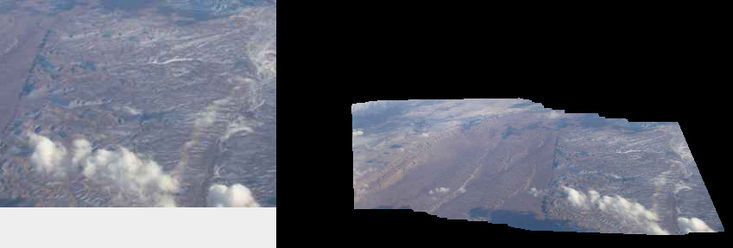
An image mosaic is created by combining numerous images together to create one large one. In this example, it is demonstrated how to create a mosaic from a video image in real-time using a high level interface which hides much of the complexity. The mosaic is created by tracking image features and fitting a motion model (affine or homography) to the feature's location in each frame.
Example File: ExampleVideoMosaic.java
Concepts:
- Image Stitching
- Image Mosaic
- 2D image motion
Relevant Videos:
Related Examples:
Example Code
/**
 * Example of how to create a mosaic from a video sequence using StitchingFromMotion2D.  Mosaics work best
 * when the scene being observed is far away or a flat surface.  The camera motion should typically be rotational only,
 * but translation can work depending on the scene's geometry.  Motion blur and cheap cameras in general will degrade
 * performance significantly with the current algorithm.  This example just demonstrates a gray scale image, but
 * with additional work color images can also be processed.
 *
 * @author Peter Abeles
 */
public class ExampleVideoMosaic {
	public static void main( String args[] ) {

		// Configure the feature detector
		ConfigPointDetector configDetector = new ConfigPointDetector();
		configDetector.type = PointDetectorTypes.SHI_TOMASI;
		configDetector.general.maxFeatures = 300;
		configDetector.general.radius = 3;
		configDetector.general.threshold = 1;

		// Use a KLT tracker
		PointTracker<GrayF32> tracker = FactoryPointTracker.klt(4,configDetector,3,GrayF32.class,GrayF32.class);

		// This estimates the 2D image motion
		// An Affine2D_F64 model also works quite well.
		ImageMotion2D<GrayF32,Homography2D_F64> motion2D =
				FactoryMotion2D.createMotion2D(220,3,2,30,0.6,0.5,false,tracker,new Homography2D_F64());

		// wrap it so it output color images while estimating motion from gray
		ImageMotion2D<Planar<GrayF32>,Homography2D_F64> motion2DColor =
				new PlToGrayMotion2D<>(motion2D, GrayF32.class);

		// This fuses the images together
		StitchingFromMotion2D<Planar<GrayF32>,Homography2D_F64>
				stitch = FactoryMotion2D.createVideoStitch(0.5, motion2DColor, ImageType.pl(3,GrayF32.class));

		// Load an image sequence
		MediaManager media = DefaultMediaManager.INSTANCE;
		String fileName = UtilIO.pathExample("mosaic/airplane01.mjpeg");
		SimpleImageSequence<Planar<GrayF32>> video =
				media.openVideo(fileName, ImageType.pl(3, GrayF32.class));

		Planar<GrayF32> frame = video.next();

		// shrink the input image and center it
		Homography2D_F64 shrink = new Homography2D_F64(0.5,0,frame.width/4,0,0.5,frame.height/4,0,0,1);
		shrink = shrink.invert(null);

		// The mosaic will be larger in terms of pixels but the image will be scaled down.
		// To change this into stabilization just make it the same size as the input with no shrink.
		stitch.configure(frame.width,frame.height,shrink);
		// process the first frame
		stitch.process(frame);

		// Create the GUI for displaying the results + input image
		ImageGridPanel gui = new ImageGridPanel(1,2);
		gui.setImage(0,0,new BufferedImage(frame.width,frame.height,BufferedImage.TYPE_INT_RGB));
		gui.setImage(0,1,new BufferedImage(frame.width,frame.height,BufferedImage.TYPE_INT_RGB));
		gui.setPreferredSize(new Dimension(3*frame.width,frame.height*2));

		ShowImages.showWindow(gui,"Example Mosaic", true);

		boolean enlarged = false;

		// process the video sequence one frame at a time
		while( video.hasNext() ) {
			frame = video.next();
			if( !stitch.process(frame) )
				throw new RuntimeException("You should handle failures");

			// if the current image is close to the image border recenter the mosaic
			StitchingFromMotion2D.Corners corners = stitch.getImageCorners(frame.width,frame.height,null);
			if( nearBorder(corners.p0,stitch) || nearBorder(corners.p1,stitch) ||
					nearBorder(corners.p2,stitch) || nearBorder(corners.p3,stitch) ) {
				stitch.setOriginToCurrent();

				// only enlarge the image once
				if( !enlarged ) {
					enlarged = true;
					// double the image size and shift it over to keep it centered
					int widthOld = stitch.getStitchedImage().width;
					int heightOld = stitch.getStitchedImage().height;

					int widthNew = widthOld*2;
					int heightNew = heightOld*2;

					int tranX = (widthNew-widthOld)/2;
					int tranY = (heightNew-heightOld)/2;

					Homography2D_F64 newToOldStitch = new Homography2D_F64(1,0,-tranX,0,1,-tranY,0,0,1);

					stitch.resizeStitchImage(widthNew, heightNew, newToOldStitch);
					gui.setImage(0, 1, new BufferedImage(widthNew, heightNew, BufferedImage.TYPE_INT_RGB));
				}
				corners = stitch.getImageCorners(frame.width,frame.height,null);
			}
			// display the mosaic
			ConvertBufferedImage.convertTo(frame,gui.getImage(0, 0),true);
			ConvertBufferedImage.convertTo(stitch.getStitchedImage(), gui.getImage(0, 1),true);

			// draw a red quadrilateral around the current frame in the mosaic
			Graphics2D g2 = gui.getImage(0,1).createGraphics();
			g2.setColor(Color.RED);
			g2.drawLine((int)corners.p0.x,(int)corners.p0.y,(int)corners.p1.x,(int)corners.p1.y);
			g2.drawLine((int)corners.p1.x,(int)corners.p1.y,(int)corners.p2.x,(int)corners.p2.y);
			g2.drawLine((int)corners.p2.x,(int)corners.p2.y,(int)corners.p3.x,(int)corners.p3.y);
			g2.drawLine((int)corners.p3.x,(int)corners.p3.y,(int)corners.p0.x,(int)corners.p0.y);

			gui.repaint();

			// throttle the speed just in case it's on a fast computer
			BoofMiscOps.pause(50);
		}
	}

	/**
	 * Checks to see if the point is near the image border
	 */
	private static boolean nearBorder( Point2D_F64 p , StitchingFromMotion2D<?,?> stitch ) {
		int r = 10;
		if( p.x < r || p.y < r )
			return true;
		if( p.x >= stitch.getStitchedImage().width-r )
			return true;
		if( p.y >= stitch.getStitchedImage().height-r )
			return true;

		return false;
	}
}
