Example Color Segmentation
From BoofCV
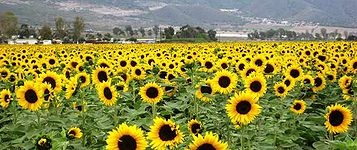
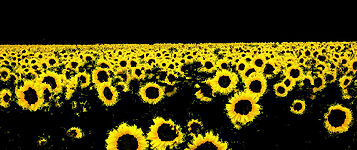
Jump to navigationJump to searchDemonstration for how an image can be segmented using color information. First the image is converted into HSV color space to add robustness against changes in lighting. Then the user selects a color and it selects pixels with a hue and saturation value and display the resulting image.
Example File: ExampleSegmentColor.java
Concepts:
- Color space
- Image segmentation
Related Examples:
Related Applets:
Example Code
/**
 * Example which demonstrates how color can be used to segment an image.  The color space is converted from RGB into
 * HSV.  HSV separates intensity from color and allows you to search for a specific color based on two values
 * independent of lighting conditions.  Other color spaces are supported, such as YUV, XYZ, and LAB.
 *
 * @author Peter Abeles
 */
public class ExampleSegmentColor {

	/**
	 * Shows a color image and allows the user to select a pixel, convert it to HSV, print
	 * the HSV values, and calls the function below to display similar pixels.
	 */
	public static void printClickedColor( final BufferedImage image ) {
		ImagePanel gui = new ImagePanel(image);
		gui.addMouseListener(new MouseAdapter() {
			@Override
			public void mouseClicked(MouseEvent e) {
				float[] color = new float[3];
				int rgb = image.getRGB(e.getX(),e.getY());
				ColorHsv.rgbToHsv((rgb >> 16) & 0xFF, (rgb >> 8) & 0xFF, rgb & 0xFF, color);
				System.out.println("H = " + color[0]+" S = "+color[1]+" V = "+color[2]);

				showSelectedColor("Selected",image,color[0],color[1]);
			}
		});

		ShowImages.showWindow(gui,"Color Selector");
	}

	/**
	 * Selectively displays only pixels which have a similar hue and saturation values to what is provided.
	 * This is intended to be a simple example of color based segmentation.  Color based segmentation can be done
	 * in RGB color, but is more problematic due to it not being intensity invariant.  More robust techniques
	 * can use Gaussian models instead of a uniform distribution, as is done below.
	 */
	public static void showSelectedColor( String name , BufferedImage image , float hue , float saturation ) {
		MultiSpectral<ImageFloat32> input = ConvertBufferedImage.convertFromMulti(image,null,true,ImageFloat32.class);
		MultiSpectral<ImageFloat32> hsv = input.createSameShape();

		// Convert into HSV
		ColorHsv.rgbToHsv_F32(input,hsv);

		// Euclidean distance squared threshold for deciding which pixels are members of the selected set
		float maxDist2 = 0.4f*0.4f;

		// Extract hue and saturation bands which are independent of intensity
		ImageFloat32 H = hsv.getBand(0);
		ImageFloat32 S = hsv.getBand(1);

		// Adjust the relative importance of Hue and Saturation.
		// Hue has a range of 0 to 2*PI and Saturation from 0 to 1.
		float adjustUnits = (float)(Math.PI/2.0);

		// step through each pixel and mark how close it is to the selected color
		BufferedImage output = new BufferedImage(input.width,input.height,BufferedImage.TYPE_INT_RGB);
		for( int y = 0; y < hsv.height; y++ ) {
			for( int x = 0; x < hsv.width; x++ ) {
				// Hue is an angle in radians, so simple subtraction doesn't work
				float dh = UtilAngle.dist(H.unsafe_get(x,y),hue);
				float ds = (S.unsafe_get(x,y)-saturation)*adjustUnits;

				// this distance measure is a bit naive, but good enough for to demonstrate the concept
				float dist2 = dh*dh + ds*ds;
				if( dist2 <= maxDist2 ) {
					output.setRGB(x,y,image.getRGB(x,y));
				}
			}
		}

		ShowImages.showWindow(output,"Showing "+name);
	}

	public static void main( String args[] ) {
		BufferedImage image = UtilImageIO.loadImage("../data/applet/sunflowers.jpg");

		// Let the user select a color
		printClickedColor(image);
		// Display pre-selected colors
		showSelectedColor("Yellow",image,1f,1f);
		showSelectedColor("Green",image,1.5f,0.65f);
	}
}

