Difference between revisions of "Tutorial Camera Calibration"
| (48 intermediate revisions by the same user not shown) | |||
| Line 1: | Line 1: | ||
= | <center> | ||
<gallery caption="Different types of supported planar calibration grids" heights=150 widths=125 > | |||
File:Calibration letter chessboard 7x5.png|Chessboard | |||
File:Calibration letter squaregrid 5x4.png|Square Grid | |||
File:Calibration letter circlehex 20x24.png|Circle Hexagonal Grid | |||
File:Calibration letter circlegrid 17x12.png|Circle Regular Grid | |||
</gallery> | |||
</center> | |||
Camera calibration is the process of estimating intrinsic and/or extrinsic parameters. Intrinsic parameters deal with the camera's internal characteristics, such as, its focal length, skew, distortion, and image center. Extrinsic parameters describe its position and orientation in the world. Knowing intrinsic parameters is an essential first step for 3D computer vision, as it allows you to estimate the scene's structure in Euclidean space and removes lens distortion, which degrades accuracy. BoofCV provides fully automated calibration for several planar target types (see pictures above) that can be easily printed on standard sized paper. | |||
Calibration in BoofCV is heavily influenced by Zhengyou Zhang's 1999 paper, "Flexible Camera Calibration By Viewing a Plane From Unknown Orientations". See his webpage below for the paper and theoretical information on camera calibration. A link is also provided to a popular matlab calibration toolbox. | |||
It is possible to either manually collect images and process them or to use a fully automated assisted calibration. Both approaches are described below. | |||
References: | References: | ||
| Line 14: | Line 19: | ||
* [http://www.amazon.com/gp/product/0521540518/ref=as_li_ss_tl?ie=UTF8&tag=boofcv-20&linkCode=as2&camp=1789&creative=390957&creativeASIN=0521540518 R. Hartley, and A. Zisserman, "Multiple View Geometry in Computer Vision"] | * [http://www.amazon.com/gp/product/0521540518/ref=as_li_ss_tl?ie=UTF8&tag=boofcv-20&linkCode=as2&camp=1789&creative=390957&creativeASIN=0521540518 R. Hartley, and A. Zisserman, "Multiple View Geometry in Computer Vision"] | ||
= Coordinate Systems = | |||
Please refer to [[Coordinate_Systems|Coordinate System]] page and understand how BoofCV defines it's coordinate system. There is no universal coordinate system standard in computer vision. | |||
= The Calibration Process = | |||
In this section, the camera calibration procedure is broken down into steps and explained. Almost identical steps are followed for calibration a single camera or a stereo camera system. First a quick overview: | |||
# Select a pattern, download (or create your own), and print | |||
# Mount the pattern onto a rigid flat surface | |||
# Take many pictures of the target at different orientations and distances | |||
# Download pictures to compute and select ones that are in focus | |||
# Use provided examples to automatically detect calibration target and compute parameters | |||
# Move calibration file to a safe location | |||
Which calibration target you use is a matter of personal preference. Chessboard patterns tend to produce slightly more accurate results. | |||
== Selecting Calibration Target == | |||
As mentioned previously, there are several calibration target types to choose from. Which one should you choose? | |||
* '''Chessboard''' patterns are by far the most popular. There is good reason for this, their corners are simple to detect and "mostly" invariant to lens distortion. The main disadvantage to chessboard is that its hard get right next to the image border, but you can get close! | |||
* '''Square Grids''' allow you to get right up next to the image border. It's more complex for a library developer to write a good high precision unbiased corner. BoofCV does an extra step of refinement that enable very high precision corners to be found. However, the current approach is less accurate under fisheye lens distortion. | |||
* '''Circle Hexagonal''' works well for regular camera lenses but is typically less accurate than chessboard of square grid because their features can't be measured directly. Tangent points are invariant under perspective distortion. Sometimes a library will use the center point, but this is ill advised because it's not invariant under perspective distortion. Errors introduced by lens distortion are less significant when the circles are small inside the image, but under heavy lens distortion these are a poor choice. | |||
* '''Circle Regular Grid''' have essentially the same pros/cons as circle hexagonal but don't have the same circle density. | |||
Summary: Use chessboard first, square grid if you are having trouble with the image border. Circle based markers for normal cameras but never for fisheye. | |||
== Creating Calibration Targets == | |||
* For a list of readily printable calibration targets see the [[Camera_Calibration_Targets|Calibration Targets]] page. | |||
* The [[Camera_Calibration_Targets|Calibration Targets]] page also provides instructions on using a BoofCV application to generate your own custom targets. | |||
* Instructions for how to create your own arbitrary calibration target for any sized paper can also be found at the [[Camera_Calibration_Targets|Calibration Targets]] page. | |||
** [https://youtu.be/TGg-xgTyaU8?t=604 YouTube Video Showing GUI Application] | |||
If your lighting is good, the image isn't blurred and BoofCV still refuses to see the calibration it might be because you incorrectly described the calibration target. How rows and columns in a target is counted isn't universally agreed upon. This is why documents generated using the generator included with BoofCV print the target's name and characteristics in the lower left hand corner. | |||
After printing, the target needs to be mounted on a flat surface. Any warping will decrease calibration accuracy. An ideal surface will be rigid and smooth. [http://www.amazon.com/gp/product/B000KNL4RK/ref=as_li_tl?ie=UTF8&camp=1789&creative=390957&creativeASIN=B000KNL4RK&linkCode=as2&tag=boofcv-20&linkId=FZWYY2AOFVCIYOOF Thick foam poster board] is easily obtainable and works well. I've also used [http://amzn.to/1kIedjn clipboards] with some minor modifications. Cardboard is OK if high precision isn't required well. For a well made target and a decent camera reprojection error is typically around 0.1 pixels. | |||
General Advice: | |||
* If possible turn autofocus on your camera off. | |||
* Use diffuse lighting. A spotlight will make the calibration target much more difficult to detect. | |||
== Calibration Target Placement == | |||
<center> | <center> | ||
[[File:Calibration placement.jpg|600px|Position the calibration target so that it covers the entire image, especially the image border and corners. The assisted calibration tool can help you do this.]] | |||
File: | |||
</center> | </center> | ||
When collecting calibration images it is best to take a diverse set of in focus image which cover the entire image, especially the image border. An example of how one can do this is down in the figure above. One problem when calibrating a camera is that the residual error can't be trusted as a way to verify correctness. For example, if all the pictures are taken in one region the results will be biased, even if the residual error is low. Also avoid extreme angles or changes distance should be avoided. | |||
A good way to check to see if calibration was done correctly is to see if straight edges are straight. In an undistorted image try moving a ruler to the image border and see if its warped. For stereo images you can see if rectification is correct by clicking on an easily recognizable feature and seeing if it is at the same y-coordinate in the other image. | |||
= Camera Models Supported = | |||
Two camera models are supported: | |||
* Pinhole with radial and tangential distortion for regular lenses | |||
* Universal Omni for fisheye lenses | |||
** Christopher Mei, and Patrick Rives. "Single view point omnidirectional camera calibration from planar grids." ICRA 2007. | |||
If you use the calibration application you can decide if you want to save the found parameters in BoofCV and OpenCV formats. | |||
= Calibration Application = | |||
BoofCV comes with a calibration application that can be used to calibrate a camera live with visual guides or from a previously collected set of images. It can be controlled using a command line interface or a GUI. | |||
If you would like to use a pre-built application it can be downloaded from here: | |||
* [ | * [[Applications#Camera_Calibration|Pre-build Calibration Application]] | ||
You can also build it from BoofCV's source code: | |||
<syntaxhighlight lang="bash"> | |||
cd boofcv/applications | |||
gradle applicationsJar | |||
java -jar applications.jar CameraCalibration | |||
</syntaxhighlight> | |||
That will print out instructions. There are two methods of input with that application. Images from a directory or live video feed from a webcam. | |||
[[File:Tutorial_calibration_config_gui.png|center|frame|Configuration can also be done using a GUI. Just add the --GUI flag to launch it. Warning, not all command line options are available from the GUI. [https://youtu.be/TGg-xgTyaU8?t=69 YouTube Video]]] | |||
'''Trouble Shooting''' | |||
* [[Manual#Build|General build problems]] | |||
== Webcam Assisted == | |||
<center> | |||
[[file:Youtube_calibration.jpg|link=https://www.youtube.com/watch?v=3SWX1iQRbsg|Demonstration Video]] | |||
</center> | |||
This live webcam calibration application is interactive and designed to ensure that your image set will be in focus, collected around the image border, and have sufficient geometric diversity. This is accomplished by; 1) guiding you to specific locations inside the image, 2) mathematically examining the current solution to see if it has sufficient geometric diversity and will converge, and 3) collecting multiple images at each location but only using the one which is the most in focus. Once you are done capturing images you're then presented with another view where you can view the results for individual images and across the whole dataset. | |||
All data is saved disk along with the found intrinsic camera parameters. Please view the video above before proceeding. | |||
Usage Examples: | |||
<syntaxhighlight lang="bash"> | |||
java -jar applications.jar CameraCalibration --Camera=0 --Resolution=640:480 CHESSBOARD --Grid=7:5 | |||
</syntaxhighlight> | |||
The arguments specify which camera to use, it's resolution, type of calibration target, and the calibration target's shape. Results will be stored in the "calibration_data" directory. You can also use the --GUI flag and graphically select a camera and configure the calibration target. | |||
== Image Directory == | |||
The | The same application can be used to calibrate from a set of previously collected images saved into a directory. By default a GUI visualizing the results is displayed, but this can be turned off. | ||
<syntaxhighlight lang="bash"> | |||
java -jar applications.jar CameraCalibration --Directory=images/ CHESSBOARD --Grid=7:5 | |||
</syntaxhighlight> | |||
Results will be stored in the "calibration_data" directory. This includes found calibration parameters along with the collected images. If using the command line isn't your thing then use the --GUI flag and select the input directory. | |||
== Custom Video Sources == | |||
The assisted calibration by default uses video feed from [http://webcam-capture.sarxos.pl/ Webcam Capture]. With a little bit of coding it's easy to add video sources from really anything as long as you can get a BufferedImage. Take a look at [https://github.com/lessthanoptimal/BoofCV/blob/master/applications/src/boofcv/app/CameraCalibration.java CameraCalibration]. | |||
= | = Source Code Examples = | ||
Coding up your own software to load and process calibration images is also easy, but more tedious. The calibration application also doesn't support stereo cameras yet. | |||
Example Code: | Example Code: | ||
# [[Example_Calibrate_Planar_Mono| Calibrate Monocular Camera]] | # [[Example_Calibrate_Planar_Mono| Calibrate Monocular Camera]] | ||
# [[Example_Calibrate_Planar_Fisheye| Calibrate Fisheye Camera]] | |||
# [[Example_Calibrate_Planar_Stereo| Calibrate Stereo Camera]] | |||
= Lens Distortion = | == Removing Lens Distortion from Images == | ||
Most computer vision algorithms assume a pin hole camera model. Undistorting an image allows you to treat the image like a pin-hole camera and can make it visually more appearing since the borders are no longer heavily distorted. This operation can be relatively expensive. Internally most algorithm in BoofCV detect features in the distorted image then undistort individual features | |||
Example Code: | Example Code: | ||
# [[ | # [[Example_Remove_Lens_Distortion| Remove Lens Distortion]] | ||
= Stereo Rectification = | == Stereo Rectification == | ||
Stereo rectification is the process of distorting two images such that both their epipoles are at infinity, typically along the x-axis. When this happens the epipolar lines are all parallel to each other simplifying the problem of finding feature correspondences to searching along the image axis. Many stereo algorithms require images to be rectified first. | Stereo rectification is the process of distorting two images such that both their epipoles are at infinity, typically along the x-axis. When this happens the epipolar lines are all parallel to each other simplifying the problem of finding feature correspondences to searching along the image axis. Many stereo algorithms require images to be rectified first. | ||
| Line 99: | Line 159: | ||
# [[Example_Rectification_Calibrated| Rectify Calibrated Stereo]] | # [[Example_Rectification_Calibrated| Rectify Calibrated Stereo]] | ||
# [[Example_Rectification_Uncalibrated| Rectify Uncalibrated Stereo]] | # [[Example_Rectification_Uncalibrated| Rectify Uncalibrated Stereo]] | ||
= OpenCV Friendly = | |||
BoofCV can now read and write YAML camera calibration files in OpenCV's format. This should at least work with OpenCV 2.4 and 3.x. So you can calibrate your camera in BoofCV using the assisted calibration app and then use its results in OpenCV! | |||
Your project must include the 'javacv' module: | |||
<pre><dependency> | |||
<groupId>org.boofcv</groupId> | |||
<artifactId>javacv</artifactId> | |||
<version>BOOFCV_VERSION</version> | |||
</dependency></pre> | |||
Once that's done you can run the following code: | |||
<syntaxhighlight lang="java"> | |||
CameraPinholeRadial param = CalibrationIO.load("boofcv_intrinsic.yaml")); | |||
UtilOpenCV.save(param, "opencv_intrinsic.yaml"); | |||
</syntaxhighlight> | |||
where "boofcv_intrinsic.yaml" is file containing intrinsic camera parameters in BoofCV format and "opencv_intrinsic.yaml" is a file in OpenCV format. | |||
Revision as of 20:22, 24 January 2020
- Different types of supported planar calibration grids
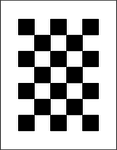
Chessboard
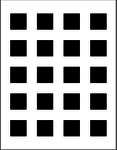
Square Grid

Circle Hexagonal Grid
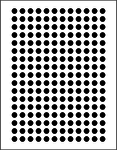
Circle Regular Grid


Camera calibration is the process of estimating intrinsic and/or extrinsic parameters. Intrinsic parameters deal with the camera's internal characteristics, such as, its focal length, skew, distortion, and image center. Extrinsic parameters describe its position and orientation in the world. Knowing intrinsic parameters is an essential first step for 3D computer vision, as it allows you to estimate the scene's structure in Euclidean space and removes lens distortion, which degrades accuracy. BoofCV provides fully automated calibration for several planar target types (see pictures above) that can be easily printed on standard sized paper.
Calibration in BoofCV is heavily influenced by Zhengyou Zhang's 1999 paper, "Flexible Camera Calibration By Viewing a Plane From Unknown Orientations". See his webpage below for the paper and theoretical information on camera calibration. A link is also provided to a popular matlab calibration toolbox.
It is possible to either manually collect images and process them or to use a fully automated assisted calibration. Both approaches are described below.
References:
- Zhang's Camera Calibration
- CalTech's Matlab Calibration Toolbox
- R. Hartley, and A. Zisserman, "Multiple View Geometry in Computer Vision"
Coordinate Systems
Please refer to Coordinate System page and understand how BoofCV defines it's coordinate system. There is no universal coordinate system standard in computer vision.
The Calibration Process
In this section, the camera calibration procedure is broken down into steps and explained. Almost identical steps are followed for calibration a single camera or a stereo camera system. First a quick overview:
- Select a pattern, download (or create your own), and print
- Mount the pattern onto a rigid flat surface
- Take many pictures of the target at different orientations and distances
- Download pictures to compute and select ones that are in focus
- Use provided examples to automatically detect calibration target and compute parameters
- Move calibration file to a safe location
Which calibration target you use is a matter of personal preference. Chessboard patterns tend to produce slightly more accurate results.
Selecting Calibration Target
As mentioned previously, there are several calibration target types to choose from. Which one should you choose?
- Chessboard patterns are by far the most popular. There is good reason for this, their corners are simple to detect and "mostly" invariant to lens distortion. The main disadvantage to chessboard is that its hard get right next to the image border, but you can get close!
- Square Grids allow you to get right up next to the image border. It's more complex for a library developer to write a good high precision unbiased corner. BoofCV does an extra step of refinement that enable very high precision corners to be found. However, the current approach is less accurate under fisheye lens distortion.
- Circle Hexagonal works well for regular camera lenses but is typically less accurate than chessboard of square grid because their features can't be measured directly. Tangent points are invariant under perspective distortion. Sometimes a library will use the center point, but this is ill advised because it's not invariant under perspective distortion. Errors introduced by lens distortion are less significant when the circles are small inside the image, but under heavy lens distortion these are a poor choice.
- Circle Regular Grid have essentially the same pros/cons as circle hexagonal but don't have the same circle density.
Summary: Use chessboard first, square grid if you are having trouble with the image border. Circle based markers for normal cameras but never for fisheye.
Creating Calibration Targets
- For a list of readily printable calibration targets see the Calibration Targets page.
- The Calibration Targets page also provides instructions on using a BoofCV application to generate your own custom targets.
- Instructions for how to create your own arbitrary calibration target for any sized paper can also be found at the Calibration Targets page.
If your lighting is good, the image isn't blurred and BoofCV still refuses to see the calibration it might be because you incorrectly described the calibration target. How rows and columns in a target is counted isn't universally agreed upon. This is why documents generated using the generator included with BoofCV print the target's name and characteristics in the lower left hand corner.
After printing, the target needs to be mounted on a flat surface. Any warping will decrease calibration accuracy. An ideal surface will be rigid and smooth. Thick foam poster board is easily obtainable and works well. I've also used clipboards with some minor modifications. Cardboard is OK if high precision isn't required well. For a well made target and a decent camera reprojection error is typically around 0.1 pixels.
General Advice:
- If possible turn autofocus on your camera off.
- Use diffuse lighting. A spotlight will make the calibration target much more difficult to detect.
Calibration Target Placement

When collecting calibration images it is best to take a diverse set of in focus image which cover the entire image, especially the image border. An example of how one can do this is down in the figure above. One problem when calibrating a camera is that the residual error can't be trusted as a way to verify correctness. For example, if all the pictures are taken in one region the results will be biased, even if the residual error is low. Also avoid extreme angles or changes distance should be avoided.
A good way to check to see if calibration was done correctly is to see if straight edges are straight. In an undistorted image try moving a ruler to the image border and see if its warped. For stereo images you can see if rectification is correct by clicking on an easily recognizable feature and seeing if it is at the same y-coordinate in the other image.
Camera Models Supported
Two camera models are supported:
- Pinhole with radial and tangential distortion for regular lenses
- Universal Omni for fisheye lenses
- Christopher Mei, and Patrick Rives. "Single view point omnidirectional camera calibration from planar grids." ICRA 2007.
If you use the calibration application you can decide if you want to save the found parameters in BoofCV and OpenCV formats.
Calibration Application
BoofCV comes with a calibration application that can be used to calibrate a camera live with visual guides or from a previously collected set of images. It can be controlled using a command line interface or a GUI.
If you would like to use a pre-built application it can be downloaded from here:
You can also build it from BoofCV's source code:
cd boofcv/applications
gradle applicationsJar
java -jar applications.jar CameraCalibration
That will print out instructions. There are two methods of input with that application. Images from a directory or live video feed from a webcam.

Trouble Shooting
Webcam Assisted
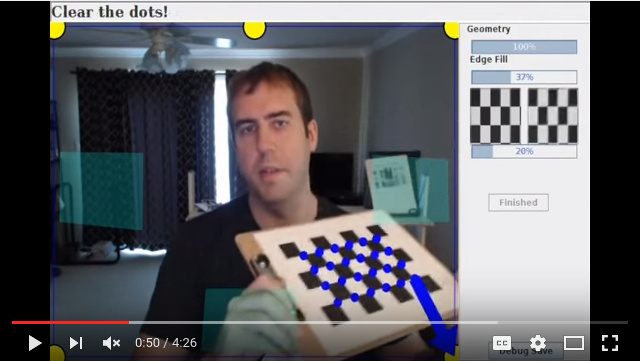
This live webcam calibration application is interactive and designed to ensure that your image set will be in focus, collected around the image border, and have sufficient geometric diversity. This is accomplished by; 1) guiding you to specific locations inside the image, 2) mathematically examining the current solution to see if it has sufficient geometric diversity and will converge, and 3) collecting multiple images at each location but only using the one which is the most in focus. Once you are done capturing images you're then presented with another view where you can view the results for individual images and across the whole dataset.
All data is saved disk along with the found intrinsic camera parameters. Please view the video above before proceeding.
Usage Examples:
java -jar applications.jar CameraCalibration --Camera=0 --Resolution=640:480 CHESSBOARD --Grid=7:5
The arguments specify which camera to use, it's resolution, type of calibration target, and the calibration target's shape. Results will be stored in the "calibration_data" directory. You can also use the --GUI flag and graphically select a camera and configure the calibration target.
Image Directory
The same application can be used to calibrate from a set of previously collected images saved into a directory. By default a GUI visualizing the results is displayed, but this can be turned off.
java -jar applications.jar CameraCalibration --Directory=images/ CHESSBOARD --Grid=7:5
Results will be stored in the "calibration_data" directory. This includes found calibration parameters along with the collected images. If using the command line isn't your thing then use the --GUI flag and select the input directory.
Custom Video Sources
The assisted calibration by default uses video feed from Webcam Capture. With a little bit of coding it's easy to add video sources from really anything as long as you can get a BufferedImage. Take a look at CameraCalibration.
Source Code Examples
Coding up your own software to load and process calibration images is also easy, but more tedious. The calibration application also doesn't support stereo cameras yet.
Example Code:
Removing Lens Distortion from Images
Most computer vision algorithms assume a pin hole camera model. Undistorting an image allows you to treat the image like a pin-hole camera and can make it visually more appearing since the borders are no longer heavily distorted. This operation can be relatively expensive. Internally most algorithm in BoofCV detect features in the distorted image then undistort individual features
Example Code:
Stereo Rectification
Stereo rectification is the process of distorting two images such that both their epipoles are at infinity, typically along the x-axis. When this happens the epipolar lines are all parallel to each other simplifying the problem of finding feature correspondences to searching along the image axis. Many stereo algorithms require images to be rectified first.
Rectification can be done on calibrated or uncalibrated images. Calibration in this case refers to the stereo baseline (extrinsic parameters between two cameras) to be known. Although in practice it is often required that lens distortion be removed from the images even in the "uncalibrated" case.
The uncalibrated case can be done using automatically detected and associated features, however it is much tricker to get right than the calibrated case. Any small association error will cause a large error in rectification. Even if a state of the art and robust feature is used (e.g. SURF) and matches are pruned using the epipolar constraint, this alone will not be enough. Additional knowledge of the scene needs to be taken in account.
OpenCV Friendly
BoofCV can now read and write YAML camera calibration files in OpenCV's format. This should at least work with OpenCV 2.4 and 3.x. So you can calibrate your camera in BoofCV using the assisted calibration app and then use its results in OpenCV!
Your project must include the 'javacv' module:
<dependency>
  <groupId>org.boofcv</groupId>
  <artifactId>javacv</artifactId>
  <version>BOOFCV_VERSION</version>
</dependency>
Once that's done you can run the following code:
CameraPinholeRadial param = CalibrationIO.load("boofcv_intrinsic.yaml"));
UtilOpenCV.save(param, "opencv_intrinsic.yaml");
where "boofcv_intrinsic.yaml" is file containing intrinsic camera parameters in BoofCV format and "opencv_intrinsic.yaml" is a file in OpenCV format.